
Planning a week or a whole month of content one post at a time can be stressful. MarketingBlocks' bulk upload lets you stack up dozens of posts inside a single CSV file and push them all into your schedule in one go. This is ideal for campaign launches, content calendars, and for persons who prefer to spend an hour scheduling than an hour a day.
This guide walks through the whole process, from grabbing the template, filling it out, getting your media links right, and troubleshooting anything that goes sideways.
What you'll find in this article
- Grab the CSV template
- Fill out the template
- Getting direct media links from popular hosts
- Uploading the CSV
- Reviewing your posts before they go live
- If something isn't working
- Checking the status of your upload
Grab the CSV template
Start by downloading a fresh copy of our CSV template. Working from an older version can cause headaches if we've added new fields, so it's worth pulling a new one each time.
- On the dashboard, click on Calendar
- Click the Manage Bulk Posts option and select Import CSV
- Hit Download CSV Template.

Fill out the template
Open the downloaded file in your spreadsheet tool of choice (Excel, Google Sheets, Numbers or Canva). Each row becomes one scheduled post.
Required columns
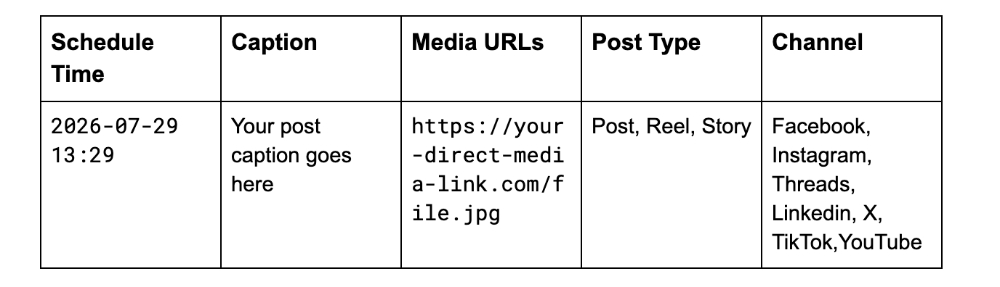
Your file needs these five columns, in this exact order:
Media URLs have to be direct links. The URL has to point straight at the file itself, not at a preview page or share page. You’ll see how to get direct media links from popular hosts below for how to do this with each service.
Column-by-column breakdown
Schedule Time
- The exact date and time the post should publish, formatted as YYYY-MM-DD HH:mm. So 1:29 pm on July 29, 2026 becomes 2026-07-29 13:29. The times are read in the specific timezone you have set up in your account.
- Leave the column empty if you intend to use the post schedule time you have set up in your account. It will automatically be set as "Add to Queue"
- One thing to watch for is if you close and reopen the CSV in Excel, it may rewrite your dates into a different format. So, ensure you always recheck the column before uploading.
Caption
- This is the text that is published with the post. Ensure the post is formatted the exact way you’ll want the post to be published.
Media URLs
- Paste the direct link to your image or video here. If you're scheduling a post that needs more than one piece of media (like a carousel), separate each link with a semi-colon (;).
- Leave the cell empty if the post is text-only.
Post Type
- This tells MarketingBlocks what kind of post to publish. It could be a reel, story, or post.
- Make sure the type you pick is actually supported on the channel you're posting to. For instance, you can't publish a Reel to LinkedIn.
Channel
- This is the destination for the post. MarketingBlocks supports the following channels: Facebook, Instagram, Linkedin, X, Tiktok, YouTube and Threads.
- The channel needs to already be connected to your MarketingBlocks account before you upload.
- Connected channels have unique Channel IDs. Copy the Channel ID and add to the channels column

A few things to keep in mind
- Column headers are case-sensitive, so stick to what's in the template.
- Each row is treated as a separate post, so don't leave blank rows between entries.
- Save the final file as .csv, not .xlsx or anything else.
Getting direct media links from popular hosts
A "direct link" is one that loads just the image or video by itself without any surrounding webpage or share preview. A link you copy from a share dialog usually isn't direct and won't work in your CSV. Here's how to get the right kind from the services people use most.
Google Drive - Images
- Drop your image into Google Drive.
- Right-click it, hover on the share option and choose Share link.
- Switch General access to Anyone with the link.
- Look at the sharing URL and grab the file ID. The file ID is the long jumble of letters and numbers in the middle of the URL.
- Plug that ID into this template: https://drive.google.com/uc?export=view&id=FILE_ID
Example: https://drive.google.com/uc?export=view&id=1AbCdEfGhIjKlMn
Alternatively, you can use this tool to generate the media URL: https://sites.google.com/site/gdocs2direct/
Google Drive - Videos
The process is nearly identical to images, but the URL format is slightly different:
- Drop your image into Google Drive.
- Right-click it, hover on the share option and choose Share link.
- Switch General access to Anyone with the link.
- Look at the sharing URL and grab the file ID. The file ID is the long jumble of letters and numbers in the middle of the URL.
- Swap it into this template: https://drive.google.com/uc?export=download&id=FILE_ID
Example: https://drive.google.com/uc?export=download&id=1AbCdEfGhIjKlMn
Alternatively, you can use this tool to generate the media URL: https://sites.google.com/site/gdocs2direct/
Dropbox - Images and Videos
- Upload your file to Dropbox.
- Right-click it and pick Share.
- In the share window, make sure Anyone with the link can view is turned on.
- Copy the link. It'll end in ?dl=0 and look something like this: https://www.dropbox.com/s/xxxxxx/filename.png?dl=0
- Change dl=0 at the end to raw=1:
Example: https://www.dropbox.com/s/xxxxxx/filename.png?raw=1
That tweak tells Dropbox to serve the raw file instead of the preview page.
Imgur
Imgur's the easiest of the bunch since everything you upload is public by default.
- Upload your image to imgur.com.
- Once it's up, right-click the image and pick Open image in a new tab.
- The URL in that new tab is the direct link, copy it from the address bar. It should end in .jpg or .png.
Example: https://i.imgur.com/AbCdEfG.jpg
Cloudinary
- Log into Cloudinary and open your Media Library.
- Upload your file (or find one you've already got).
- Click the asset to open its details panel on the right.
- Hit the Copy URL button or right-click the asset and choose Copy URL → Original.
- That's your direct link. Paste it straight into your CSV.
Example: https://res.cloudinary.com/your-cloud-name/image/upload/v1234567890/your-file.jpg
Heads up: Cloudinary assets are public by default through their delivery URLs, but if you've locked things down with access controls, double-check that the file is set to public before using its URL.
Uploading the CSV
Once your file is filled out and saved:
- Go to the All Posts/Calendar option.
- Click the Manage Bulk Posts option and select Import CSV
- Click Upload file and pick your CSV from your computer.

Reviewing your posts before they go live
Before you schedule a post, MarketingBlocks reads your file and shows you a preview of every post uploaded from the CSV. This is an opportunity to spot typos, wrong links, incorrect channel types or wrong schedule times.
- Hover on any of the uploaded posts to see the “Edit” icon and click on it
- Go through the list and make everything look right.
- Once done, click Save Changes or Cancel if no changes were made.
- If everything checks out, click Import Posts to schedule them.

If something isn't working
If you see an error on the review screen, here are what you should look out for:
- Headers: Column names are case-sensitive and have to match the template exactly.
- Empty rows: Blank rows inside your data confuse the importer. Ensure you delete them before uploading.
- Date format: Reopening the file in Excel sometimes reformats your dates. If posts aren't being scheduled at the right time, check this first.
- Channel ID: Each connected channel has a unique ID assigned to it. Ensure to copy and paste the correct ID.
- Post Type: Posts types like reel and story can only be used on Facebook and Instagram. Cross check this before uploading.
When media isn't showing up
If your posts import but the images or videos don't appear, run through this checklist:
✅ Is the URL direct? Paste it into a fresh browser tab. If you see just the file (no webpage around it), you're good.
✅ Is it public? Private links won't load. Double-check sharing is set to public or "anyone with the link."
✅ Does it end in a file extension? Direct links usually end in .jpg, .jpeg, .png, .mp4, or similar.
✅ Is the file oversized? Large files sometimes time out. Try compressing large files before you upload.
✅ Is the host supported? Stick to the services listed above. Social platforms like Facebook and Instagram don't expose usable direct links.
If you’re still stuck after doing all of the above, try re-uploading the file to a different host. That usually tells you whether the issue is with the file itself or the link you were using.
Checking the status of your upload
Once your file successfully uploaded, MarketingBlocks processes each row and gives you a way to see exactly how things went including how many posts made it through and how many failed.
- Click the Manage Bulk Post button.
- Select View Bulk Processes.
From here you'll see each upload listed with its overall status (completed or failed), the total number of posts in the file, and a breakdown of how many passed and how many failed.

For any upload that has issues, click View Detail next to the entry. This opens a per-post breakdown showing exactly why each failed post didn't go through, so you can fix the rows in your CSV and re-upload.

And that’s it!
If you need further assistance, kindly use the chat widget at the bottom-right corner of this page or send an email to our support desk(support@marketingblocks.ai) for prompt assistance.
Thank you!